It’s been a busy few months working on our little house project. It’s still a work in progress but I thought it was time to share what we have created so far.
WE HAVE A KITCHEN!
In such a small space we have had to be clever with its functionality. We have screwed the lids of jars underneath the wooden shelves to utilise both the top and underneath of the space, I buy our food in bulk and store it in mason jars and up cycled jam jars which I really like the look of. Mugs hang from the shelves too, and instead of cutlery draws we simply keep them in jars too! All of the kitchen materials were scavenged from building sites (the timber doors are old flooring boards, the work top was rescued from a skip), timber yards (the wooden shelves are scrap oak), or begged and permanently borrowed (our oven and fridge are up cycled from my Nans old flat, and all our jars are those which I have collected for a rainy day). I am also trying to find some wicker baskets to use in place of another cupboard, and what with us still being in the process of setting up we don’t have a working fridge (not enough electricity from our one solar panel). This has meant we loose a lot of fresh produce from the heat…and so unfortunately we have had to resort to packaged good (gasp of horror!!)… But we’re working on it I promise!

Kitchen

Hanging mugs and jars are a great way to utilise all available space

So our kitchen is also our bathroom storage as well at the moment…notice any of my home made skin care products?
A LIVING ROOM/SNUG
Another rescued piece- our wooden shutters (which I LOVE) were being thrown in a skip…why oh why?? But good for us because now get to use them, admire them, and generally feel good about saving them. Win.
Our hammock can be pulled out to use or tucked away when we want some more space, a little momento from travelling and there really is nothing better than hanging in a hammock with a cup of tea and a good book. Bliss.
Our bed…is not a bed. It’s a futon which we donate to the dog in the day and pull it out at night for us to sleep on. This is fortunately not a permanent feature. We are going to be building a bed into the wall which we can fold up and down to use, which will save space, and make the living area fully functional.
The wicker basket is our wood store…I found this on the street years ago, and although I did have doubts at the time, the half hour it took to drag it home was totally worth the effort!
Oh and we totally found the rug in a skip just days after we carpeted the hut and were slightly appalled by our efforts. I couldn’t believe it, I mean what are the chances?
Under-window storage, will have doors eventually, and was made from unwanted oak. Yes please, more oak…can’t get enough of it. Storage is so crucial in a space like this, but it’s also important (I think) to make a feature of it so it fits in and isn’t an eye sore.

Old vintage wardrobe door up cycled to be our wall mounted mirror, decorated with my jewellery.

Our snug with hammock out

Spot the horse-dog on our temporary bed

Storage unit and under-window seating. Made from oak and my Nans cushions. Our hand made up cycled scrap wood plant box can be seen through the window…love my flowers!

Up cycled wicker basket box for our wood store, wood burner harth made from slate which we bought for £1 a tile in Whales and that which shaped ourselves.
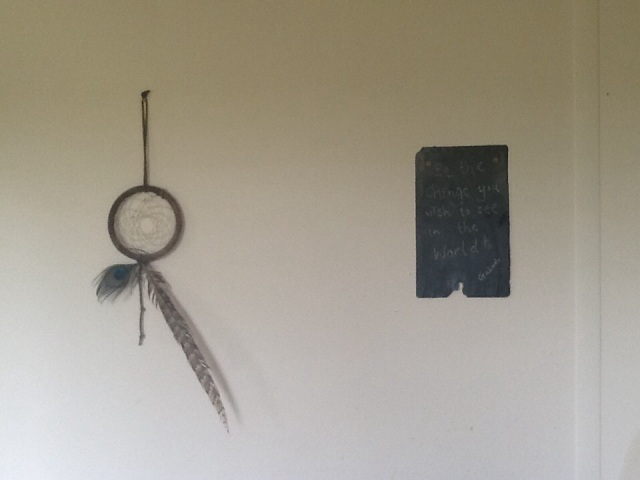
My hand made dream catcher, and slate which I chalked my favourite quote onto
ECO-POWER
So this is why we have a few rough wires flung over things…we bought our first solar panel! Which means although it’s not enough electricity to run our fridge, we are now running our music system, laptops, and mobiles from energy harnessed from the sun. I’m sorry-but how cool is that?!?
NIGHT TIME LIGHTING
We still don’t have light bulbs. Or plug sockets. Or enough cabling. So we made the most of what we did have and so I made an up cycled candelabra using old jars of chutney, a small amount of picture wire, and a beautiful piece of scrap oak. It looks so beautiful at night time because it creates patterns on the wood work…plus remember that big crack left by the ceiling falling down? Not anymore! Nothing better than a cosmetic repair.

Hanging candles
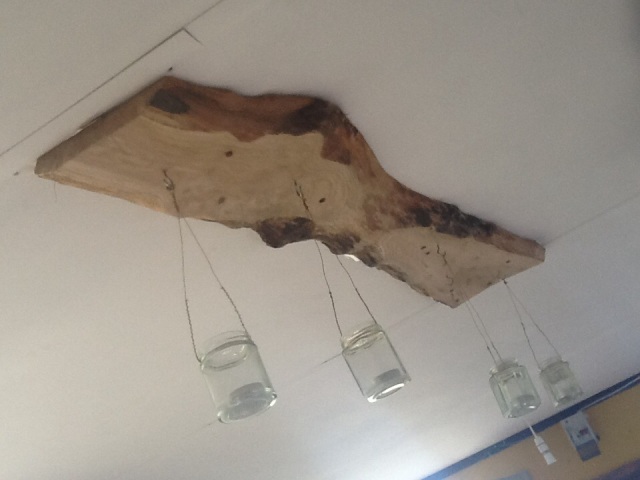
Up cycled light feature
NEXT STEPS
Another two solar panels will give us enough electricity for lights and our fridge.
A fold out bed to save space.
Waste-water bucket to catch our kitchen sink water which I will reuse to water my garden.
Compost bin so we don’t waste left over food.
Recycling bins so I don’t have to relive my student days by having a collection of recyclables spilling into my living space.
Some more built in storage units.
So that’s it so far, all space saving, money saving, environment saving suggestions welcome! Simply comment below ☺️


