UP-CYCLED BLACK BOARDS: A DIY special for Zero Waste Week

UP CYCLING with blackboard paint

I LOVE BLACKBOARD PAINT. It is cheep, versatile, and adds an interesting and interactive twist to every day objects. It sticks to glass, wood, chip board, metal, and even ceramic. I’ve been experimenting with items at our “pay as you feel” wasted food cafes in Brighton.

My first item: A TIP POT. A ceramic coffee pot for sprouting new ideas. Cafe visitors can place inside their constructive tips, ideas, feedback, and give their contact details for volunteering.

Tip Pot! Not for money, but for tips, literally.

Tip Pot! Not for money, but for tips, literally.

11249638_10155995714675587_4983854464308262465_n 12006103_10155995714770587_3620715700046853442_n

GLASS TABLE-PIECES. How do you spread key messages about the environment and society to a room of 300 hungry people? Make interesting table pieces for them to ready whilst they eat! A great way to offer information about our project, where the food comes from, and why we are feeding bellies not bins. Each week I can add different wasted food facts, local statistics, interesting tips to reduce wasting food, and event updates.

Couldn't find flowers so I used leeks...you say that's odd, I say that's ingenious. Potato tomato no?

Couldn’t find flowers so I used spring onions…you say that’s odd, I say that’s ingenious.

INFO AND MENU BOARDS:

Ironically made from my old kitchen cupboards, I wanted an interesting but simply set of boards for our basic cafe needs.

11742720_10155762425075587_7633790049605421318_n

I hand draw all my designs but stencilling would be a great way to achieve uniformity across your designs.

11700887_10155763273955587_5722444830091076350_n

Completed menu sign which I get the kids to fill in at the cafes

11542013_10155763274090587_449144776366674898_n

Because I’m English

11988451_1704800313089593_1297780733592118758_n

Need a bigger sign

So there you have it, you can turn any piece of tat or rubbish into quirky objects with a purpose. A nice hobby to have, so why not try it out yourself this zero waste week?

Hut home continued

It’s been a busy few months working on our little house project. It’s still a work in progress but I thought it was time to share what we have created so far.

WE HAVE A KITCHEN!

In such a small space we have had to be clever with its functionality. We have screwed the lids of jars underneath the wooden shelves to utilise both the top and underneath of the space, I buy our food in bulk and store it in mason jars and up cycled jam jars which I really like the look of. Mugs hang from the shelves too, and instead of cutlery draws we simply keep them in jars too! All of the kitchen materials were scavenged from building sites (the timber doors are old flooring boards, the work top was rescued from a skip), timber yards (the wooden shelves are scrap oak), or begged and permanently  borrowed (our oven and fridge are up cycled from my Nans old flat, and all our jars are those which I have collected for a rainy day). I am also trying to find some wicker baskets to use in place of another cupboard, and what with us still being in the process of setting up we don’t have a working fridge (not enough electricity from our one solar panel). This has meant we loose a lot of fresh produce from the heat…and so unfortunately we have had to resort to packaged good (gasp of horror!!)… But we’re working on it I promise!

image

Kitchen

image

Hanging mugs and jars are a great way to utilise all available space

image

So our kitchen is also our bathroom storage as well at the moment…notice any of my home made skin care products?

A LIVING ROOM/SNUG

Another rescued piece- our wooden shutters (which I LOVE) were being thrown in a skip…why oh why?? But good for us because now get to use them, admire them, and generally feel good about saving them. Win.

Our hammock can be pulled out to use or tucked away when we want some more space, a little momento from travelling and there really is nothing better than hanging in a hammock with a cup of tea and a good book. Bliss.

Our bed…is not a bed. It’s a futon which we donate to the dog in the day and pull it out at night for us to sleep on. This is fortunately not a permanent feature. We are going to be building a bed into the wall which we can fold up and down to use, which will save space, and make the living area fully functional.

The wicker basket is our wood store…I found this on the street years ago, and although I did have doubts at the time, the half hour it took to drag it home was totally worth the effort!

Oh and we totally found the rug in a skip just days after we carpeted the hut and were slightly appalled by our efforts. I couldn’t believe it, I mean what are the chances?

Under-window storage, will have doors eventually, and was made from unwanted oak. Yes please, more oak…can’t get enough of it. Storage is so crucial in a space like this, but it’s also important (I think) to make a feature of it so it fits in and isn’t an eye sore.

image

Old vintage wardrobe door up cycled to be our wall mounted mirror, decorated with my jewellery.

image

Our snug with hammock out

image

Spot the horse-dog on our temporary bed

image

Storage unit and under-window seating. Made from oak and my Nans cushions. Our hand made up cycled scrap wood plant box can be seen through the window…love my flowers!

image

Up cycled wicker basket box for our wood store, wood burner harth made from slate which we bought for £1 a tile in Whales and that which shaped ourselves.
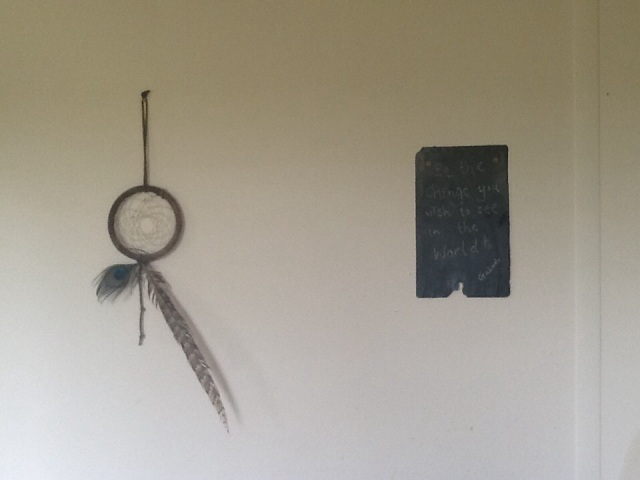
My hand made dream catcher, and slate which I chalked my favourite quote onto

My hand made dream catcher, and slate which I chalked my favourite quote onto

ECO-POWER

So this is why we have a few rough wires flung over things…we bought our first solar panel! Which means although it’s not enough electricity to run our fridge, we are now running our music system, laptops, and mobiles from energy harnessed from the sun. I’m sorry-but how cool is that?!?

NIGHT TIME LIGHTING

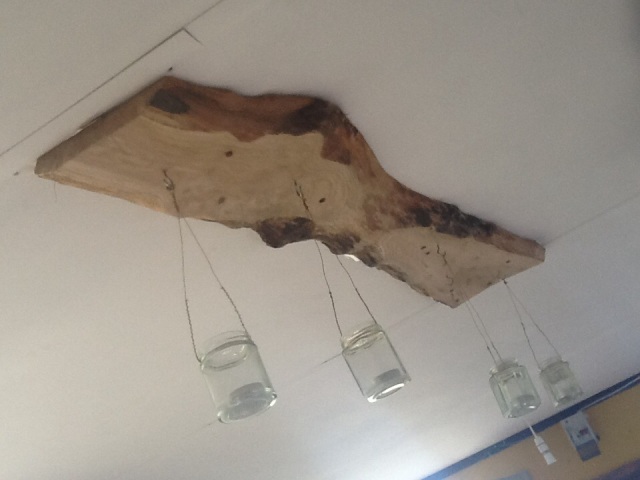
We still don’t have light bulbs. Or plug sockets. Or enough cabling. So we made the most of what we did have and so I made an up cycled candelabra using old jars of chutney, a small amount of picture wire, and a beautiful piece of scrap oak. It looks so beautiful at night time because it creates patterns on the wood work…plus remember that big crack left by the ceiling falling down? Not anymore! Nothing better than a cosmetic repair.

image

Hanging candles

image

Up cycled light feature

NEXT STEPS

Another two solar panels will give us enough electricity for lights and our fridge.

A fold out bed to save space.

Waste-water bucket to catch our kitchen sink water which I will reuse to water my garden.

Compost bin so we don’t waste left over food.

Recycling bins so I don’t have to relive my student days by having a collection of recyclables spilling into my living space.

Some more built in storage units.

So that’s it so far, all space saving, money saving, environment saving suggestions welcome! Simply comment below ☺️

The Rubbish Junkies Waste Free Recipe for Whipped Coconut Oil Moisturiser.

As requested, I will be posting several waste-free skin care recipes over the coming weeks. I thought I would start off with something easy, which is incidentally one of my favourites: The Rubbish Junkies Whipped Coconut Oil Moisturiser.

WHAT YOU NEED:

  • 10-20 drops of an essential oil of your choice (I like Lavender, but I have also been told my Tea-Tree version is very effective at healing sore over-blown noses and opening up sinuses-perfect for making yourself feel a little better when suffering from a common cold).
  • Electric whisk
  • Mixing bowl
  • One up-cycled jam jar

WHAT TO DO:

1) Place your coconut oil in a mixing bowl

Coconut oil MUST be solid to successfully whisk. If you are luck enough to live in a hot climate, place it in the fridge until hard.

Coconut oil MUST be solid to successfully whisk. If you are luck enough to live in a hot climate, place it in the fridge until hard

2) Whisk on the electric whisks lowest setting (e.g. level 1). I use the lowest setting because solid coconut oil can spray all over the place when you first start whisking. You don’t want to be finding coconut oil half way up your kitchen walls.

3) Add one teaspoon of liquid vitamin e. This will keep your skin nice and healthy, perfect during the long English winters.

Liquid vitamin e can be bought from your local health food shop. I use this particular brand because the bottle can be recycled.

Liquid vitamin E can be bought from your local health food shop or online. I use this particular brand because it is sold by my local health food shop which means I can support local businesses, and the bottle can be recycled.

4) Add drops of your chosen essential oil. I usually add 10 drops, whisk to mix it through, and add up to 10 drops more depending on my preference for fragrance strength.

Please research your essential oil of choice before applying it to you skin. Some essential oils should be avoided by pregnant women, infants, and young children.

Please research your essential oil of choice before applying it to your skin. Some essential oils should be avoided by pregnant women, infants, and young children.

5) Whisk until light and creamy. Fold the cream using a table spoon to make sure there are no hidden coconut oil lumps. Total whisking time: approximately 10 minutes.

IMG_4315

The ideal consistency!

The ideal consistency!

6) Decant the cream into your used jam-jar and store in a cool place.

IMG_4318

So there you have it! It really is that simple.

By using quirky up-cycled jars, these make great gifts for waste-free birthdays too!

SHELF LIFE: This simple recipe uses all shelf-stable ingredients, a jar this size usually lasts me 4 months before I simply run out.

APPLICATION: I use a tea spoon for application to avoid any unwanted moisture from my hands entering the jar and causing a risk of mould. This also means you can share your jar without sharing germs. A little goes a long way, and the smallest piece will melt onto your skin and leave you feeling soft and lovely.

STORAGE: Store in a cool space, bathroom cupboards are fine. You will notice that the creamy texture can alter depending on the temperature (coconut oil melts when heated, and goes rock solid when cold). If your cream goes hard, simply run it under hot water, and if it goes runny just pop it in the fridge. Your jar of moisturiser can be re-whipped any time, and even when hard it will melt on your skin.

USES: I use this moisturiser on my legs and underarms after shaving, I use it as a face-cream at night time, a hand-cream after work, and I use it as a massage cream for myself and my partner. It’s known as the “miracle cream” in my house! It has cleared up mild acne and blemishes, it’s softened skin, and even helped sooth sore areas such as over-blown noses. This is NOT however, a medical cream, and should not be used as such. It’s just a simple way to feel soft, smooth, and luxurious, without spending a tonne of money on chemically infused beauty products packaged in toxic plastics!